

Deploying MsPASS on an HPC cluster#
Overview#
First, by HPC (High-Performance Computing) we mean a cluster of multiple nodes linked by high speed interconnections designed for large-scale, parallel processing. If you are not familiar with modern concepts of this type of hardware and how they interact in HPC systems you should first do some background reading started with the section in our Getting Started pages found at MsPASS Virtual Cluster Concepts.
An axiom for working with MsPASS on a cluster is that any workflow you develop should first be prototyped on a desktop system. HPC systems are by definition designed to run large jobs that run on multiple nodes and use many cores. It is always best to test run any workflow on a subset of your data. For most people that is easiest on their office desktop machine. With that model you should plan to first construct the python code defining your workflow within a jupyter notebook on your desktop machine, transfer that notebook to the HPC system you want to use for the (presumably) much larger data set, and then face the new idioms of the HPC system you will be using.
Like your desktop system every HPC cluster has a set of local idioms. Examples, are file system directory names and variations in the software used to run jobs on the cluster. If there are other people in your institute who use MsPASS on the same cluster, your job will be much easier. In that case, you may be able to adapt an existing run script and/or configuration files from a colleague and bypass much of this document. If you are a pioneer in using MsPASS at your institution, you will need to read this more carefully.
At present there are two different approaches to running MsPASS on HPC cluster: (1) a python “launcher” method, and (2) a unix shell method. Unless you are an expert in the bash scripting language, most users will likely find the python launcher an easier way to get started. These two methods are described in separate sections below. First, however, it is necessary to describe some concepts you will need to understand to run a job with either method.
HPC MsPASS Concepts#
The block diagram in Figure Fig. 4 is an abstraction of the fundamental components required to run a MsPASS job on an HPC system. These components are not independent and it is necessary to understand how and when the different components in that diagram need to come into existence.
HPC clusters use the idea of “batch processing” that dates to the earliest “supercompouters”, which were then called “mainframe computers”, of the 1960s. In modern HPC clusters that idea has evolved to job submission software. Users submit “jobs” to the cluster through a command line interface with the “job” being defined by a file that on all HPC systems today is a unix shell script. The “jobs” submitted are managed by a job scheduler (not to be confused with the dask/spark scheduler used in MsPASS) that manages which of many competing “jobs” will be run when. The submission process requires the user to specify the resources required for the job (e.g. number of nodes/cores and minimum memory requirements) and the amount of time those resources will be needed. Unlike time-shared access that is the norm for desktops, the job scheduler on an HPC cluster guarantees exclusive access to the requested resources for the time requested. Figure Fig. 4 illustrates the concept that the job scheduler selects a set of nodes, assigns them to your “job”, and starts to run your job script. In this case of MsPASS the actual physical hardware is abstracted to a set of services that define the framework. How those services are apportioned between the available nodes is a configuration issue. Because different jobs you may submit require vastly different resources (e.g. one node versus 10) this topic is more complicated for HPC systems than a desktop where the resources available are fixed.
It is important to realize that you need to think of the MsPASS framework as four services: database (db), scheduler, worker(s), and frontend. The first thing your “job” needs to do to run a MsPASS workflow is to launch an instance of each of those services. MsPASS implements these services as a run argument to a standard “container”. On desktop systems the standard application to run a container is a package called docker. For a variety of reasons docker is not used on HPC clusters. Instead the standard container launcher on HPC is apptainer. (Note until around 2023 this application was called singularity. Some sites may still run the legacy version.) There are currently two ways to launch these services: (a) a python launcher and (b) a unix shell script normally edited to become the job script.
Once the services are all running a job normally start running a python script that defines the MsPASS workflow. That script can either be in the form of a plain python script or a sequence of run boxes in a jupyter notebook. In the first case the job has to run a python interpreter on the same node as the cluster scheduler. With a jupyter notebook the script is executed through the frontend service, which is normally launched on the same node as the scheduler.
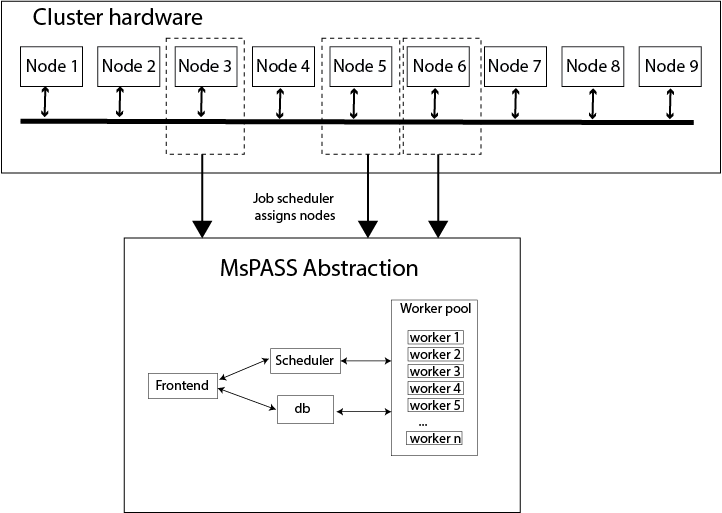
Fig. 4 Conceptual diagram of how an HPC job scheduler allocates a set of nodes (3 in this example) as resources to construct a virtual cluster in MsPASS. The lines with arrows show illustrate that the physical hardware can be thought of as inputs used to define the virtual cluster illustrated here with the box with the label “MsPASS Abstraction”. How the inputs are allocated to build that cluster is the configuration problem that is the main topic of this section.#
Common Requirement#
At the time of this writing a software package called apptainer is the standard application for launching containerized applications like MsPASS on HPC clusters. HPC systems do not use docker for security reasons because docker defaults to allowing processes in the container to run as root. Apptainer, however, is compatible with docker in the sense that it can pull containers constructed with docker and build a file to run on the HPC cluster. That is the approach we use in this section.
Your first step is to login to a “head node”, which means the host name you use to login to the cluster. HPC clusters commonly support a wide range of applications. As a result, all HPC clusters we know of have a software management system that controls what software is loaded in your environment. A typical incantation is the following:
module load apptainer
If apptainer is not available on your cluster, you will need to consult with system administrators to see if they run an alternative or are able to install apptainer. For smaller, specialized clusters you can consider building a local instance of MsPASS that doesn’t use the container if apptainer is a problem. That is not recommended for a variety of reasons but is possible.
Once your shell knows about apptainer you will need to create an instance of the MsPASS container. Unless you have a quota problem we recommend you put the container file in the directory ~/mspass/containers. Assuming that directory exists the following commands can be used to generate your working copy of the MsPASS container:
cd ~/mspass/containers
apptainer build mspass_latest.sif docker://mspass/mspass
When the command exits you should now see the file “mspass_latest.sif” in the current directory (“~mspass/containers” for the example). Note this is different from docker. Docker caches container data in its own work space. Apptainer creates a file, which in the case above we called “mspass_latest.sif”, containing the data required to launch the container.
Launching Services#
Python Launcher#
Installation#
The python launcher for MsPASS is distributed as part of a separate
python package called mspass_launcher. If you are reading this
you have probably already used this package to install
mspass-desktop.
First you should check what the default python interpreter is for your installation using .. code-block:
python --version
If the version is less than 3.10 we recommend you enable a higher version. A typical example with module is the following:
module load python/3.10.10
where the actual tag you will use after “python” is likely different.
Be aware the version must 3.10 or higher as this package uses
the match-case construct that was not available prior to 3.10.
There are other options with virtual environments
(notably pyenv and conda env),
but you should use
that approach only if you are familiar with how to work with virtual
environments.
We then recommend you install mspass_launcher as a “local” package
with pip as follows
pip install --user mspass_launcher
If you are using a virtual environment run pip in the desired environment.
Configuration#
Running the python launcher requires editing a configuration
file. The normal expectation is that file has the magic
name HPCClusterLauncher.yaml and an instance of that file
is present in the job’s run directory.
If a colleague at your institution has run MsPASS we advise you to
use it as a starting point. If not, copy the master from the package
install directory (see internet sources on where a –user packages are installed)
or download the master from GitHub
here.
Edit that file for your installation and the requirements of your workflow. Details on how to do that are found in this document.
Prepare a job script#
We assume the MsPASS script you will use to drive your data processing has been debugged previously and is in the form of either a jupyter notebook or a python run script. In either case it is important to realize the process must not require any user input since by definition an HPC job runs in “batch” mode.
A typical python job script would look like this:
#! /bin/bash

# ... Series of job scheduler resource definitions ...
module load apptainer
module load python/3.10.10  # optional - only needed if not using default python
cd *working_directory*
python << EOI
from mspass_launcher.hpc import HPCClusterLauncher
launcher = HPCClusterLauncher()
launcher.run("myscript.py")
EOI
where working_directory and the name “myscript.py” would by customized.
Note the HPCClusterLauncher.run method works with either
a pure python script as in the above example or for a jupyter notebook
file (“.ipynb” file name). We reiterate, however, that a notebook
file must be “runable” without intervention.
Finally, you should also be aware that
the constructor for the HPCClusterLauncher object uses
the default configuration file in the current directory. As you use
MsPASS for a range of projects you will likely develop multiple configuration
files that specify, for example, different numbers of workers. You
can specify an alternative configuration file by giving a path to that
file as arg0 or via the kwarg with key “configuration_file”.
For example, if you had a “configurations” directory in your home directory
with an alternate file “quartz_4_node.yaml” you could change that line of the
script to the following:
launcher = hpc.HPCClusterLauncher("~/configurations/quartz_4_node.yaml")
or alternatively
launcher = hpc.HPCClusterLauncher(configuration_file="~/configurations/quartz_4_node.yaml")
Job submission#
Once you have a “job script” like the example above prepared you need to “submit” the job to the cluster. The command you use to do that will depend on the job scheduler used on that cluster. A common example today is a “slurm”, but others are similar. The only difference is the incantations used to define resources and the command tool used to submit or monitor the progress of a job.
As an example, assume the “job script” we prepared has the file name “myproject.job”. If you login to a head node on the cluster and cd to the directory where the job script is located you would submit it with “slurm” as follows:
sbatch myproject.job
noting the the “.job” in that file name is not required. It was done in this illustration to clarify it not a regular bash script but a slurm job. The general approach is the same for all other job schedulers but the command to submit the job will be different.
Understanding the python submission#
The way the HPCClusterLauncher object works is
potentially confusing because an instance of the class has to
manage the virtual cluster it launches and submit jobs to that
cluster. A wiring diagram may aid your understanding is
seen below in Figure Fig. 5.
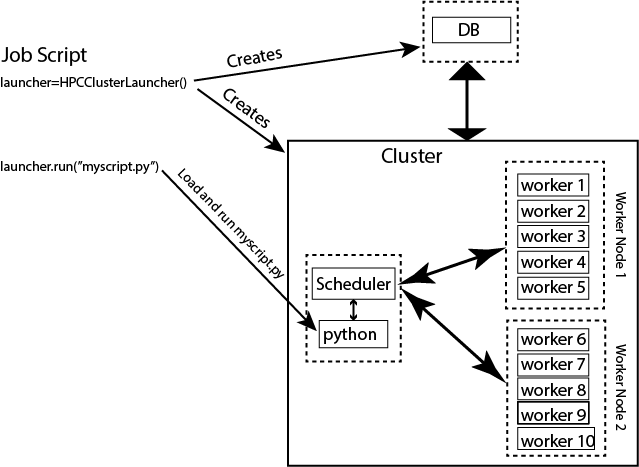
Fig. 5 Simplified wiring diagram for MsPASS cluster abstraction using the
python launcher for HPC systems (HPCClusterLauncher).
The figure emphasizes that HPCClusterLauncher
launches containers that define MsPASS services: db, scheduler,
worker(s), and frontend. Note the “frontend” in this case is
little more than an alias for python (illlustrated) because in this context when the
HPCClusterLauncher.run
method is called jupyter notebooks are first passed through nbconvert
to convert the notebook to a python script
before being run with an instance of python run on the frontend
container.#
Important concepts that follow from the figure above are
A typical job runs on multiple nodes. What service is run on what node is configurable. An exception is that the python run script always runs on what we call the primary node. It is normally the same node as the scheduler service.
A corollary of 1 is that all serial processing will run on the primary node and compete for resources with any other service running on that node.
The python interpreter running your job intercepts parallel constructs and submits them as task to “workers” managed by the “scheduler” service. The workers may be processes running on the same node as the scheduler or others designated as worker nodes.
The job script that launches the processing runs on the primary node, but outside the container. That means the job script operates in a completely different python environment that the processing workflow that always run inside the containers. The is illustrated in the figure by showing the job script as running on the primary node but outside the boundaries of any of the service boxes. In words, the job script above launches an instance of a
HPCClusterLauncherand then executes our workflow python/noebook file using theHPCClusterLauncher.runmethod.
Shell Script Run Option#
Overview#
Prior to the 2025 the only way to run MsPASS on any
system was a totally command line driven method.
That was true for both desktop and clusters.
The mspass-desktop application
described in Command Line Docker Desktop Operation and the
HPCClusterLauncher class described above were
developed to simplify running MsPASS. This section
describes an alternative, now legacy approach some may prefer.
It uses a lengthy shell script to launch MsPASS on an HPC cluster.
The process is conceptually identical, but uses bash
instead of python to handle the launch process. You may prefer this
approach if you are an expert bash programmer or have used MsPASS
previously in this mode.
Get a Copy of Configuration Scripts#
You may first want to search the suite of configuration scripts found on github here If the system you are using has a folder there you should download the scripts from the appropriate folder and you should be able to proceed without having to dig too deep into this section. We assume here the file name convention is the same as that for the set in the folder template. If the file names for your institution are different you will have to do some additional work to puzzle out what was done. If there are deviations we recommend the author supply a README file.
If the files you need are not on github and you are aware of colleagues using mspass you may need to contact them and ask for their working startup scripts. If you are a trailblazer, then you will need to jump to the section below titled Setting Up Configuration Files on a new Cluster. You can then use the next section for reference when you are actively working with MsPASS on that system.
Build MsPASS Container with Apptainer#
You will need to build an apptainer file. The process for this options is identical to that described above.
Edit template scripts#
Overview#
HPC clusters are designed to run large jobs and are not well-suited to interactive work. We reiterate that you are advised to develop your notebook on a desktop system using docker and a small subset of the data you need to process. This section assumes you have such a workflow debugged and ready to release on the full data set. It also assumes you aren’t a trailblazer and you have a template “job script” you or someone else at your institute has created that you only need to modify.
This section describes how to create a mspass “job” on HPC system as a set of unix shell scripts. We use that model because all HPC centers use the unix shell as the “job control” language. Old-timers from the days of mainframe computers from IBM and CDC may remember older, more primitive job control languages like the long dead IBM JCL (job control language). The concept is the same but today the language is a version of the unix shell. At present all our examples use the shell dialect called bash, but you are free to use any shell dialect supported by the cluster operating system.
Our standard template uses three shell scripts that work together to run a mspass workflow. The section heading titles below use the names of the template files. You can, of course change any of the file names provided you know how they are used.
mspass_setup.sh#
Before you run your first job you will almost certainly need to create a private copy of the template file mspass_setup.sh. This script does little more than define a set of shell environment variables to define where on the cluster file system the job can find your data and the mspass container. It also needs to define where a suite of work directories the different components of MsPASS need to utilize. The mspass_setup.sh file contains shell commands to set all the parameters that most users will need to customize. The idea is each user-dataset combination will normally require edits to this file. The rest of this section is arranged in the order of appearance of parameters in the template version of mspass_setup.sh show here:
#! /bin/bash

# See User's Manual for more guidance on setting these variables
export MSPASS_HOME=~/mspass
export MSPASS_CONTAINER=${MSPASS_HOME}/containers/mspass_latest.sif
# the container boots.  Usually an explicit path is best to avoid
export APPTAINER_BIND=/N/slate/pavlis,/N/scratch/pavlis

export MSPASS_WORK_DIR=/N/slate/pavlis/test_scripts
export MSPASS_DB_DIR=/N/scratch/pavlis/usarray/db
export MSPASS_LOG_DIR=/N/scratch/pavlis/usarray/logs
export MSPASS_WORKER_DIR=/N/scratch/pavlis/usarray/work


export HOSTNAME_BASE="carbonate.uits.iu.edu"

if [ -z $MSPASS_RUNSCRIPT ] ; then
  export MSPASS_RUNSCRIPT=/N/slate/pavlis/test_scripts/run_mspass.sh
fi
Notice that all this shell script does is set several environment variables that all begin with the string MSPASS_. The first one set is MSPASS_HOME. It is used like many software packages to define the home base for the software. In the MsPASS case it is used to define the location of the container needed to run MsPASS. If you created a private copy of the container in the section above you will not need to alter this parameter at all. If multiple people at your institute run MsPASS, there may be a master copy of the MsPASS container you can use in this definition. If so insert that path for this parameter.
The next line, which sets the environment variable APPTAINER_BIND, is a bit more obscure. Full understanding of why that incatation is necessary requires the concept of how to “bind” a file system to the container. A starting point is the apptainer documentation found here. Briefly, the idea is much like a file system “mount” in unix. The comma separated list of directory names will be visible to your application as if it were a local file system. For the example above, that means your python script can open files in directories “/N/slate/pavlis” or “/N/scratch/pavlis”. Provided you have write permission to those directories you can also create file(s) and subdirectories under that mount point. Finally, note it is possible to also mount a file system on one of two standard mount points in the container: “/mnt” and “/home”. That can be convenient, for example, to utilize a database created with docker where files were similarly “bound” to /home so that “dir” entries in wf database collections do not resolve.
The four variables MSPASS_WORK_DIR, MSPASS_DB_DIR, MSPASS_LOG_DIR, and, MSPASS_WORKER_DIR define key directories needs to work. There use is as follows:
MSPASS_WORK_DIR is best viewed as the run directory. The run script will launch jupyter notebook with this directory as the top level directory. That means your notebook must be in this directory. It also serves as a top-level directory for defaults for MSPASS_DB_DIR, MSPASS_LOG_DIR, and, MSPASS_WORKER_DIR as noted in related items below.
MSPASS_DB_DIR is the work directory where MongoDB uses to store database data. If this variable is not set it defaults to $MSPASS_WORK_DIR/db.
MSPASS_LOG_DIR is used to write any log files. In MsPASS that means MongoDB and dask/Spark. Any application that extends MsPaSS may choose to log its own messages there. If so we recommend creating an appropriately named subdirectory under the one defined for MSPASS_LOG_DIR. If this variable is not set it defaults to $MSPASS_WORK_DIR/logs
MSPASS_WORKER_DIR is used by dask/Spark as a scratch workspace. Currently that workspace is always in a subdirectory with the path $MSPASS_WORKER_DIR/work. If this variable is not set it defaults to $MSPASS_WORK_DIR/work
HOSTNAME_BASE should be set to the network subnet name the cluster runs in. That is usually necessary because all clusters we know of use a shortened name convention for individual nodes (i.e. the hostname has no “.” that is used for subnet naming.) If you are using an existing configuration file you almost certainly can use the value you inherited. Be warned that all HPC clusters we know use short names internally and the subnet definition is only needed if you plan to work interactively.
MSPASS_RUNSCRIPT defines what in section MsPASS Virtual Cluster Concepts is called a “virtual cluster”. The file is normally static for a particular cluster, although there may be mulitple options. e.g. the standard template file has versions with or without MongoDB “sharding”. For most users this file should be treated as static until performance becomes an issue and you find it necessary to do some advanced tuning. The last section of this document describes how that file may need to be modified if you are the first to use mspass on a cluster.
job_script.sh#
job_script.sh is the shell script you submit that runs your “job” on the cluster. Standard usage with slurm as the workload manager to run the workflow in the jupyter notebook file myworkflow.ipynd is;
sbatch job_script.sh myworkflow.ipynb
The template file assumes the file mspass_setup.sh defined above and the notebook file, myworkflow.ipynb, are present in the directory defined by MSPASS_WORK_DIR.
The only thing you would normally need to change in job_script.sh are the run parameters passed to slumm with the #SBATCH lines at the top of the file. There are always cluster-dependent options you will need to understand before running a large job. Consult local documentation before setting these directives and submitting your first job.
Running a notebook interactively#
In some cases is may be necessary or helpful to develop your workflow, which in the MsPASS case means the code blocks in a jupyter notebook, on the cluster. Even if you developed the notebook on a desktop it is often necessary to run the same test you prototyped on the HPC cluster before running a very large job. The simplest way to do that is to just run the notebook as above and verify you got the same answer you got on the version you debugged on your desktop. You may need to follow the procedure here if you need to do some additional interactive debugging or your desktop has limitations (e.g. memory size) that you cannot simulate on your desktop. This section describes the basic concepts required to do that. Details will differ with how you communicate with the HPC cluster. That is, what web browser you use on our local to interact with the jupyter notebook server. Furthermore, the complexity of ths section should be a warning that this entire process is not a good idea, at least for getting strarted, unless you have no other option.
The procedure for running MsPASS interactively is similar to that for running containers on a desktop system found in Command Line Docker Desktop Operation. There are two key differences: (1) you launch MsPASS with apptainer (or something else) instead of docker and (2) there are a lot of potential network issues this manual cannot fully cover. This subsection is mainly aimed to address the first. We provide only some initial suggestions below for potential networking issues.
We assume that the interactive job you need to run is suitable for the all-in-one configuration we use in docker. In that configuration all the individual MsPaSS components are run as different processes in one container on one node. Our template script for setup is called single_node.sh. A method to launch MsPASS in that mode with slurm would be to enter the following command:
sbatch single_node.sh
You should then use the squeue slurm command to monitor when your job starts or watch for the appearance of the output file defined by slurm commands in single_node.sh. Typically use the unix cat command to print the output file. The output is similar to what one sees with docker run. The following is an example output generated this way on the Indiana University cluster called “carbonate”:
singularity version 3.6.4 loaded.
Currently Loaded Modulefiles:
1) quota/1.8                      8) boost/gnu/1.72.0
2) git/2.13.0                     9) gcc/9.1.0
3) xalt/2.10.30                  10) openblas/0.3.3
4) core                          11) intel/19.0.5
5) hpss/8.3_u4                   12) totalview/2020.0.25
6) gsl/gnu/2.6                   13) singularity/3.6.4
7) cmake/gnu/3.18.4              14) openmpi/intel/4.0.1(default)
/N/slate/pavlis/usarray
Thu Jan 26 10:43:56 EST 2023
{"t":{"$date":"2023-01-26T15:44:10.476Z"},"s":"I",  "c":"CONTROL",  "id":20697,   "ctx":"main","msg":"Renamed existing log file","attr":{"oldLogPath":"/N/slate/pavlis/usarray/logs/mongo_log","newLogPath":"/N/slate/pavlis/usarray/logs/mongo_log.2023-01-26T15-44-10"}}
[I 10:44:16.973 NotebookApp] Serving notebooks from local directory: /N/slate/pavlis/usarray
[I 10:44:16.974 NotebookApp] Jupyter Notebook 6.2.0 is running at:
[I 10:44:16.974 NotebookApp] http://c4:8888/?token=e7464f3b156b27efcaf2c9e52197b40068c5eefd8231a955
[I 10:44:16.974 NotebookApp]  or http://127.0.0.1:8888/?token=e7464f3b156b27efcaf2c9e52197b40068c5eefd8231a955
[I 10:44:16.974 NotebookApp] Use Control-C to stop this server and shut down all kernels (twice to skip confirmation).
[C 10:44:17.036 NotebookApp]

To access the notebook, open this file in a browser:
    file:///N/slate/pavlis/usarray/.local/share/jupyter/runtime/nbserver-11604-open.html
Or copy and paste one of these URLs:
    http://c4:8888/?token=e7464f3b156b27efcaf2c9e52197b40068c5eefd8231a955
 or http://127.0.0.1:8888/?token=e7464f3b156b27efcaf2c9e52197b40068c5eefd8231a955
Like the docker case the information to connect to Jupyter is found in the last few lines. For the above example the key line is:
[I 10:44:16.974 NotebookApp] http://c4:8888/?token=e7464f3b156b27efcaf2c9e52197b40068c5eefd8231a955
In this case c4 is the hostname that for this cluster was shortened for simplicity of communication within the cluster. If connecting from outside the cluster, which would be the norm, for this example we would need to modify that url. Your use will vary, but in this case the connection would use the following url:
http://c4.uits.iu.edu:8888/?token=e7464f3b156b27efcaf2c9e52197b40068c5eefd8231a955
Thanks to cut-paste standard graphical manipulation today as usual that is the best way to pass that messy URL to a browser. We emphasize the detailed URL you would used is heavily site dependent. There can be a great deal more complexity than this simplified example where all we change is the hostname. You can universally expect to need a more complex mapping to get the remote connection from your browser through the cluster firewall. The mechanism may be defined in the script defined by MSPASS_RUNSCRIPT, but it might not be either. Some guidance can be found in the networking configuration subsection below and by looking at other implementation found on in the scripts directory of the mspass github site.
There is a final, very important warning when running a “job” interactively started with slurm. When you finish the interactive work you should kill your running “job” immediately. If you don’t the node will sit around doing nothing until the time limit you specified expires. If you ignore this warning you can quickly burn your entire allocation with no results. With slurm the way to terminate an interactive job is:
squeue -u myusername
scancel jobid
Where you would run that pair of commands sequentially. For the first Substitute your user name. The output will show an “id” with a format something like this:
JOBID PARTITION     NAME     USER ST       TIME  NODES NODELIST(REASON)
3298684   general   mspass   pavlis  R       4:33      1 c4
For this example jobid is 3298684. That job is “killed” by the command scancel 3298684.
Finally, some clusters have a simplified procedure to run interactive jobs through some form of “gateway”. For example, Indiana University has a “Research Desktop” (RED) system that provides a way to run a window on your local system that makes appear like a linux desktop. In that case, running an interactive job is exactly like running with docker except you use singularity/apptainer and can run jobs on many nodes. In addition, the batch submission is not necessary and you can run the configuration shell script interactively. For the RED example you can explicitly launch and “interactive job” that creates a terminal window. Inside that terminal you can then run:
source single_node.sh
which should generate an output similar to that above for the sbatch example. Connection to the jupyter notebook server is then simple via a web browser running on top of the gateway.
If running on distributed nodes, when starting the DB Client, the host name should be specified, it is defined as the environment variable MSPASS_SCHEDULER_ADDRESS. For example:
from mspasspy.db.client import DBClient
import os
dbclient=DBClient(os.environ.get("MSPASS_SCHEDULER_ADDRESS"))
Here the primary node is MSPASS_SCHEDULER_ADDRESS, and the frontend is running on the node, it should be specified explicitly.
Setting Up Configuration Files on a new Cluster#
Overview#
If you are a trailblazer at your institution and need to configure MsPASS for your local cluster, you may want to first review the material in this User’s Manual found in the section MsPASS Virtual Cluster Concepts. That provides some fundamental concepts on HPC systems and how those concepts are abstracted in MsPASS to produce a virtual cluster. This section focuses on the nuts and bolts of what you might have to change in your local configuration. The descriptions here are limited to the simpler situation with a single instance of the database server (not “sharded”). Sharding is an advanced topic and we assume if you are needing that feature you are hardy enough you solve the problem yourself. This section assumes you have a copy of the file in the mspass scripts/template directory called “run_mspass.sh”. You may also find it useful to compare that file to the examples for specific sites.
The “Role” Concept#
In the section titled MsPASS Virtual Cluster Concepts we discuss in detail the abstraction we used in MsPASS to define what we call a “virtual cluster”. A key idea in that abstraction is a set of functional boxes illustrated in Fig. 6. The function each box illustrated there is defined by what we call its “role”. The keywords defining “role”, with one line descriptions of what functionality they enable are the followings:
db creates and manages the MongoDB server
scheduler is the dask or spark manager that controls data flow to and from workers
worker task that do all the computational task.
frontend is the jupyter notebook server, which means it also is the home of the master python script that drives your workflow.
Note the configuration illustrated in Fig. 6 is a graphical illustration of that created with the template run_mspass.sh script.
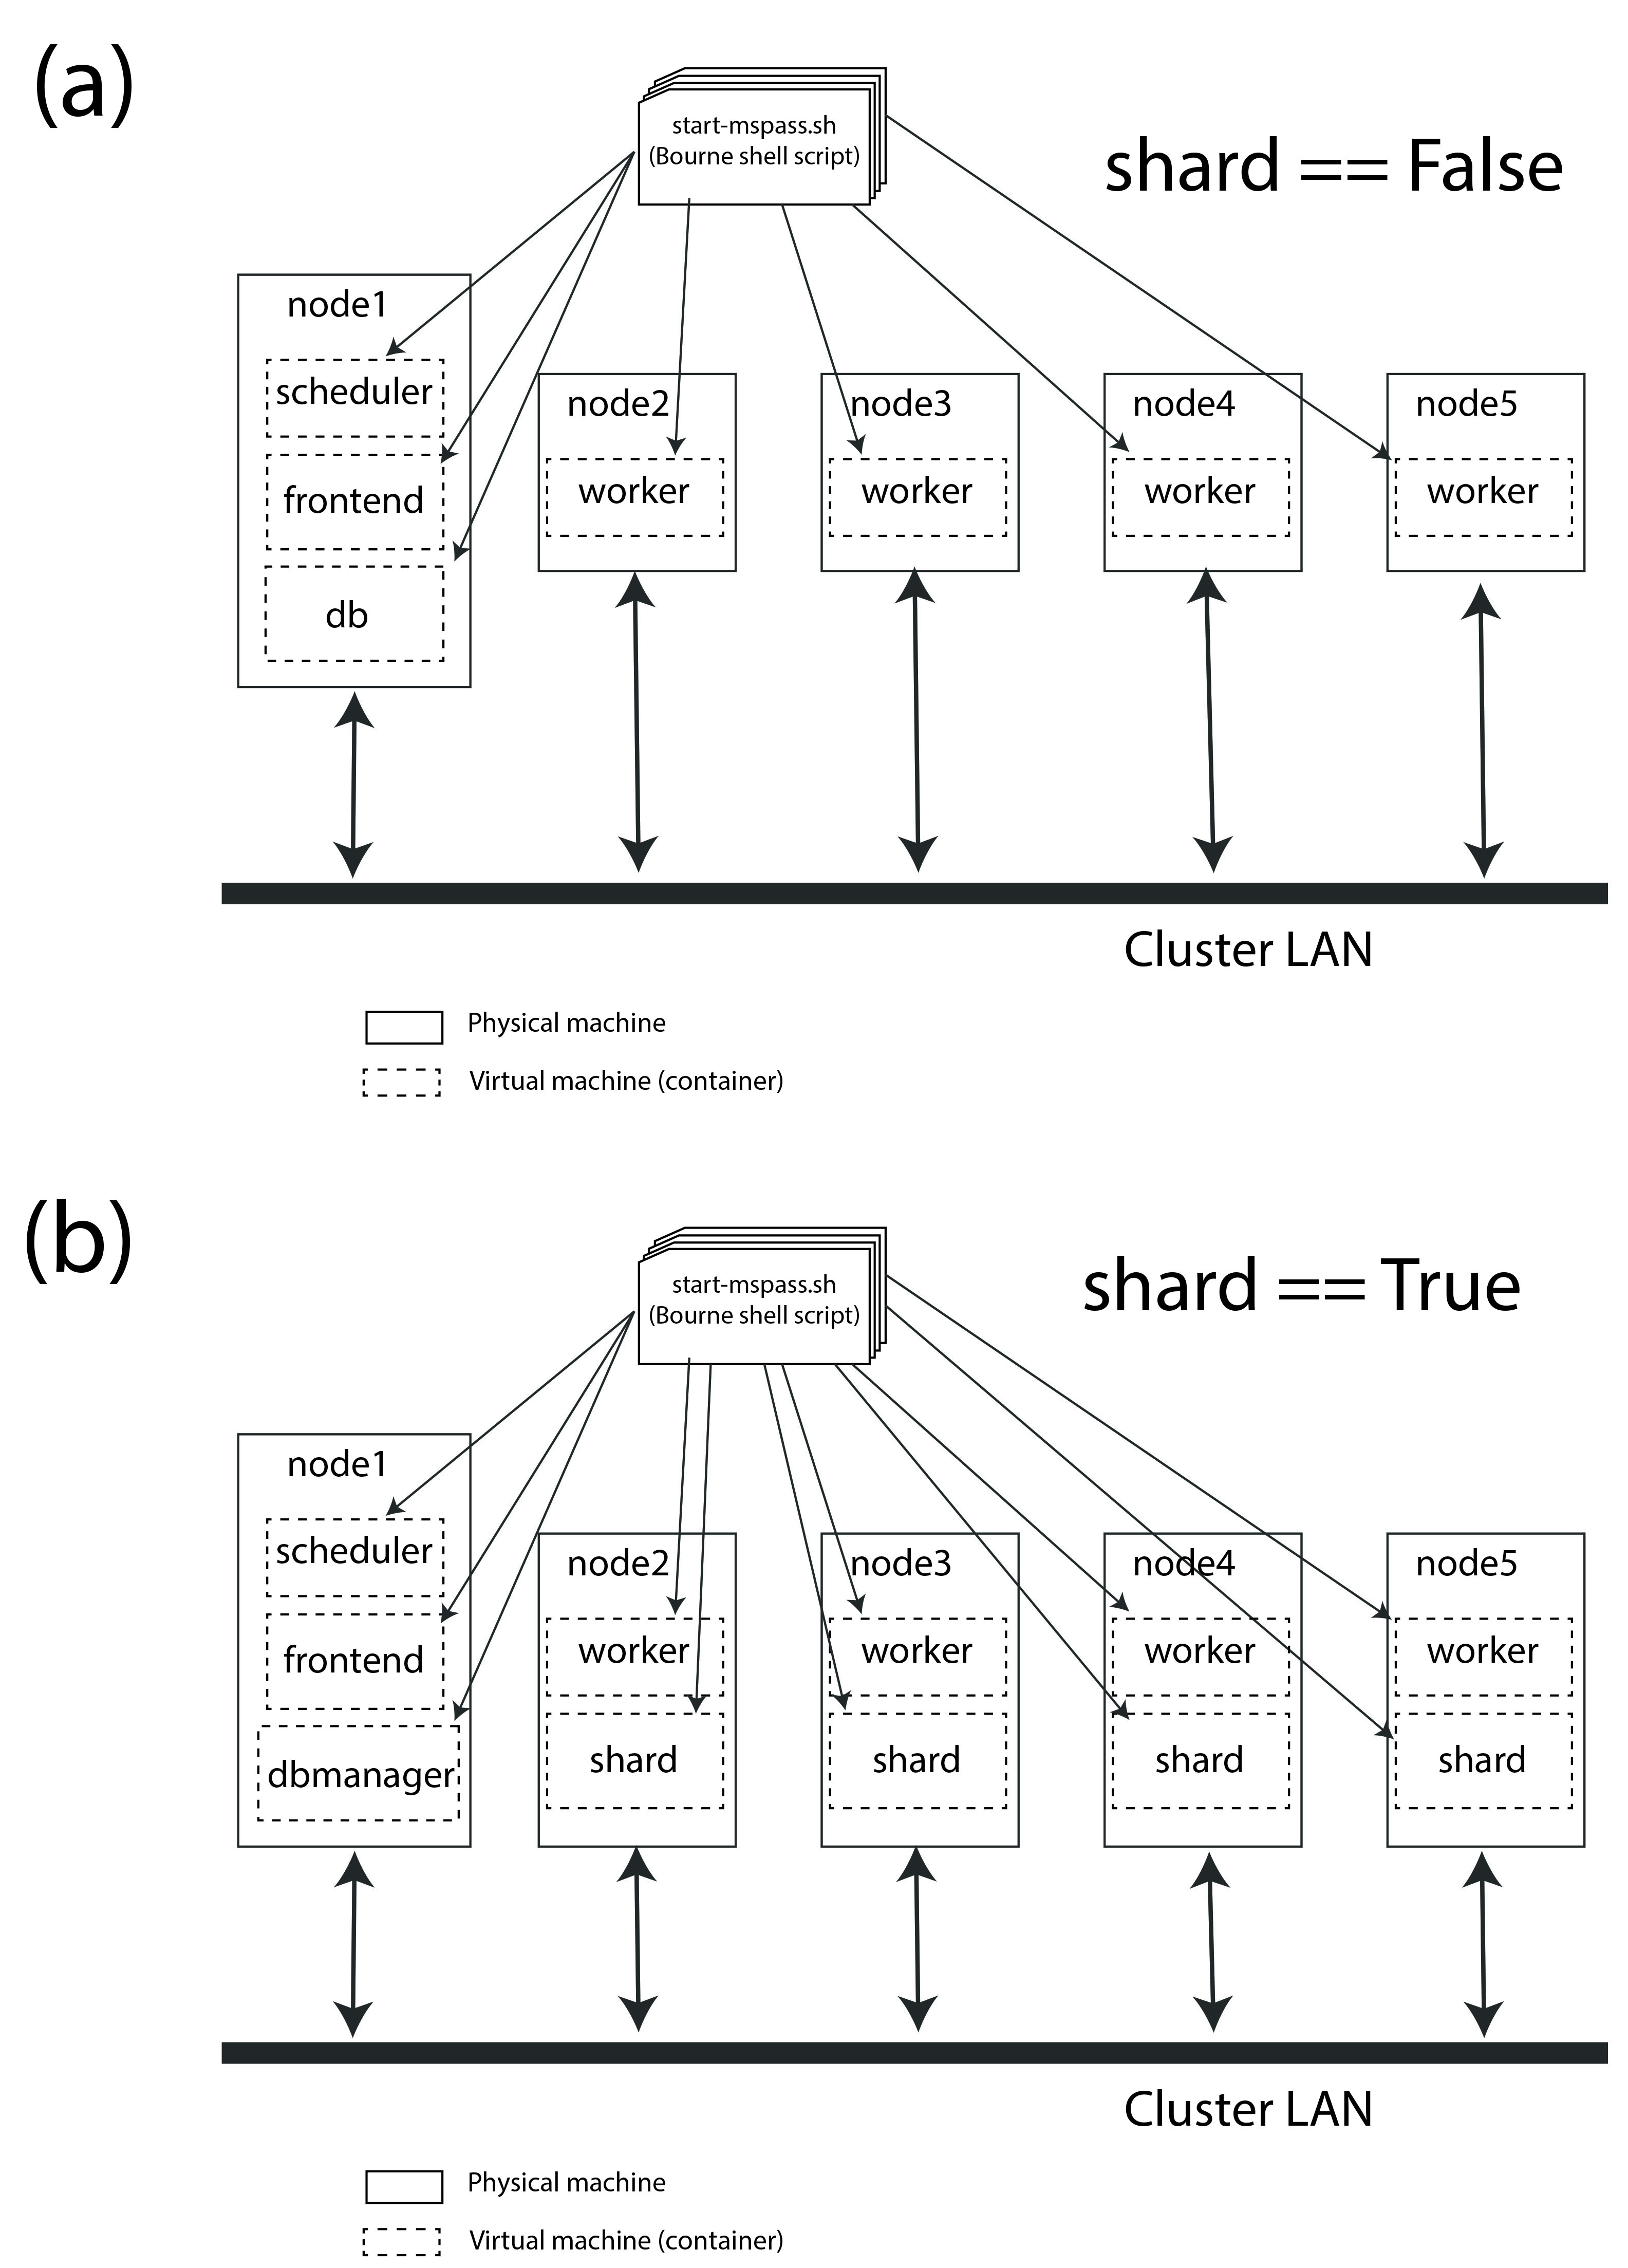
Fig. 6 Block diagram of virtual cluster that is defined by the run_mspass.sh template file. This illustrates the geometry for five nodes, but the configuration is open-ended. If more than 5 nodes are used any additional nodes will be set with role == “worker”. Notice with this configuration all roles other than worker are run on the same node as the job script is executed illustrated here as “node 1”#
How Different Roles are Run#
Notice from Fig. 6 that all 4 roles are launched as separate instances of the container. In the script they are all launched with variations of this following:
SING_COM="apptainer run $MSPASS_CONTAINER"
APPTAINERENV_MSPASS_WORK_DIR=$WORK_DIR \
     APPTAINERENV_MSPASS_ROLE=scheduler $SING_COM &
where we illustrate the definition of the symbol SING_COM for clarity only. In the actual script that line appears earlier. The above is the actual launch line for the scheduler. Note the following that are used when each instance of the container is launched:
The run command is preceded by a set of shell variable definitions that all begin with the keyword APPTAINERENV. An odd feature of apptainer is any shell symbol it detects that begin with APPTAINERENV have that keyword stripped and the result posted to a shell environment variable that is available to the container boot script, which in mspass is called start-mspass-sh, (That shell script is not something you as user would ever change but it may be instructive to look at that file to understand this setup. That file can be found in the mspass github site at the top of the directory chain.) For example, when the above line is executed the variable MSPASS_ROLE is set to “scheduler”.
Notice the container is launched as a background process using the standard unix shell “&” idiom. Notice that all lines that execute $SING_COM contain the “&” symbol EXCEPT the jupyter notebook server that is the last line in the script. That syntax is important. It cause the shell running the script to block until the notebook exits. When the master job script exits apptainer does the housecleaning to kill all the running containers on multiple nodes running in the background.
The instances of the container for the db and frontend role launch are similar to the scheduler example above but with different APPTAINERENV inputs. The worker launching is different, however, and is the topic of the next section.
Launching Workers#
Launching workers is linked to a fundamental problem you will face in adapting the template script to a different cluster: node-to-node communications. There are three low-level issues you will need to understand before proceeding:
How are nodes addressed? i.e. what symbolic name does node A need to know to talk to node B?
What communication channel should be used between nodes?
For the first, all the examples we know use a short form of hostname addressing that strips a subnet description. You are probably familiar with this idea working on any local network. e.g. the machine in my office has the long name “quakes.geology.indiana.edu”. That name resolves as a valid hostname on the internet because it is advertised by campus name servers. Within my department’s subnet, however, I can reference to the same machine with the simpler name “quakes”. The same shorthand is standard on any clusters we know of so short hostnames are the norm.
That background is necessary to explain this incantation you will find in run_mspass.sh:
NODE_HOSTNAME=`hostname -s`
WORKER_LIST=`scontrol show hostname ${SLURM_NODELIST} | \
           awk -vORS=, -v hostvar="$NODE_HOSTNAME" '{ if ($0!=hostvar) print $0 }' | \
           sed 's/,$/\n/'`
The first line returns the human readable name of the node on which the script is being executed. The -s, which is mnemonic for short, strips the subnet name from the fully qualified hostname. As noted above it may not be required on your site as it is common to use only the base name to reference nodes.
The second line, which truly deserved the incantation title, sets the shell variable WORKER_LIST to a white-space delimited list of the hostname of all nodes allocated to this job excluding the node running the script (result of the hostname command). To help clarify here is the section of output produced by this script run with four nodes on an Indiana University cluster:
Lauching scheduler on primary node
c23,c31,c41
where c23, c31, and c41 are the hostnames of the three compute nodes slurm assigned to this job. That list is used to launch each worker in another shell incantation that follows immediately after the above:
APPTAINERENV_MSPASS_WORK_DIR=$WORK_DIR \
  APPTAINERENV_MSPASS_SCHEDULER_ADDRESS=$NODE_HOSTNAME \
  APPTAINERENV_MSPASS_ROLE=worker \
  mpiexec -n $((SLURM_NNODES-1)) -host $WORKER_LIST $SING_COM &
This uses the openmpi command line tool mpiexec to launch the container on all the nodes except the first one in the list. We are only using mpi as a convenient way to launch background processes on nodes slurm assigns to the job. An alternative that might be preferable at other sites is do the same thing with a shell loop and calls to ssh. The mpi implementation shown here, however, is known to work and one or more versions of mpi are universally available at HPC centers at the time this manual was written. Hence, you the odds are high you will not need to modify this line.
Communications#
Last, but far from least you may need to sort out some fundamental issues about how networking is implemented on your cluster. There are two different issues you may need to consider:
Are there any network communication restrictions between compute nodes? Dask and spark have different communication setups described in the links in this sentence. The general pattern seems to be that clusters are normally configured to have completely open communication between nodes within the cluster but are appropriately paranoid about connections with the outside world. i.e. you probably won’t need to worry about connectivity of the compute nodes, but problems are not inconceivable.
A problem you are guaranteed to face is how to connect to a job running on the cluster. The simplest example is needing to connect to the jupyter notebook server for an interactive run. We reiterate that isn’t a great idea, but you will likely eventually need to use that feature to solve some problem that you can’t solve easily with batch submissions. A more universal need is to run real-time dask diagnostics. These are an important tool to understand bottlenecks in a parallel workflow that are limiting performance. For dask diagnostics to work you will need to connect on some port (default is 8787) to the node running the scheduler. The fundamental problem both connection face is that cluster are normally accessible from outside only through “login nodes” (also sometimes called head nodes). The login nodes are sometimes called a network “gateway” to the cluster, which should not be confused with the something more properly called a “scientific gateway”. The later is a simplified access method to reduce the very kind of complexity discussed in this section for normal humans.
Our template script addresses item 2 by a variant of that describe in this dask package extension documentation. That source has some useful background to explain the following approach we use in our template run_mspass.sh script:
NODE_HOSTNAME=`hostname -s`
LOGIN_PORT=`echo $NODE_HOSTNAME | perl -ne 'print (($2+1).$3.$1) if /c\d(\d\d)-(\d)(\d\d)/;'`
STATUS_PORT=`echo "$LOGIN_PORT + 1" | bc -l`
echo "got login node port $LOGIN_PORT"

NUMBER_LOGIN_NODES=4
LOGIN_NODE_BASENAME=login
for i in `seq $NUMBER_LOGIN_NODES`; do
  ssh -q -f -g -N -R $LOGIN_PORT:$NODE_HOSTNAME:8888 $LOGIN_NODE_BASENAME$i
  ssh -q -f -g -N -R $STATUS_PORT:$NODE_HOSTNAME:8787 $LOGIN_NODE_BASENAME$i
done
The complexity of the first section using perl solves a potential problem automatically. Because login nodes are nearly always shared by multiple users a fixed port for a connection to the login can easily cause a mysterious collision if two people attempt to use the same port to access the login node. The approach used here is that used at TACC. The perl command converts the compute node’s hostname to a port number. Since while you run your job you are the only one who can access that node that will guarantee a unique connection. That approach may not work at other sites. A simpler solution that might be suitable for many sites is to just set LOGIN_PORT and STATUS_PORT to some fixed numbers known to not collide with any services on the login node.
The second section above (i.e. the part below the blank line) solves a second potential problem. A large cluster will always have multiple login/head nodes. The example in the template file is set for TACC where there are four login nodes with names login1, login2, login3, and login4. Thus, above we set NUMBER_LOGIN_NODES to 4 and the shell variable LOGIN_NODE_BASENAME to “login”. You will need to change those two variables to the appropriate number and name for your cluster. The ssh lines in the for loop set up what is called an ssh tunnel from the compute node to all the login nodes. It is necessary to create that in the job script as the job scheduler normally assigns the you to the least busy login node when you try to connect to one of them. The mechanism above allows you to access the jupyter notebook listening on port 8888 to the port number created in the earlier incantation from the compute node name. Similarly the dask status port 8787 is mapped to the value of $STATUS_PORT.
We emphasize that none of the network complexity is required in two situations we know of:
If you only intend to run batch jobs, then connections to the outside will not be needed and you can delete all the network stuff from the template. In fact, we recommend you prepare a separate run script, which you might call run_mspass_batch.sh that simply deletes all the network stuff above.
Some sites may have a science gateway setup to provide a mechanism to run jobs interactively on the cluster. The example noted earlier used at Indiana called “RED” is an example. With RED you launch a window on your desktop that behaves as if you were at the system console for the login node. In that situation the ssh tunnel stuff is not necessary. A web browser running in the RED window can connect directly with port 8888 and port 8787 on the compute node once the job starts.